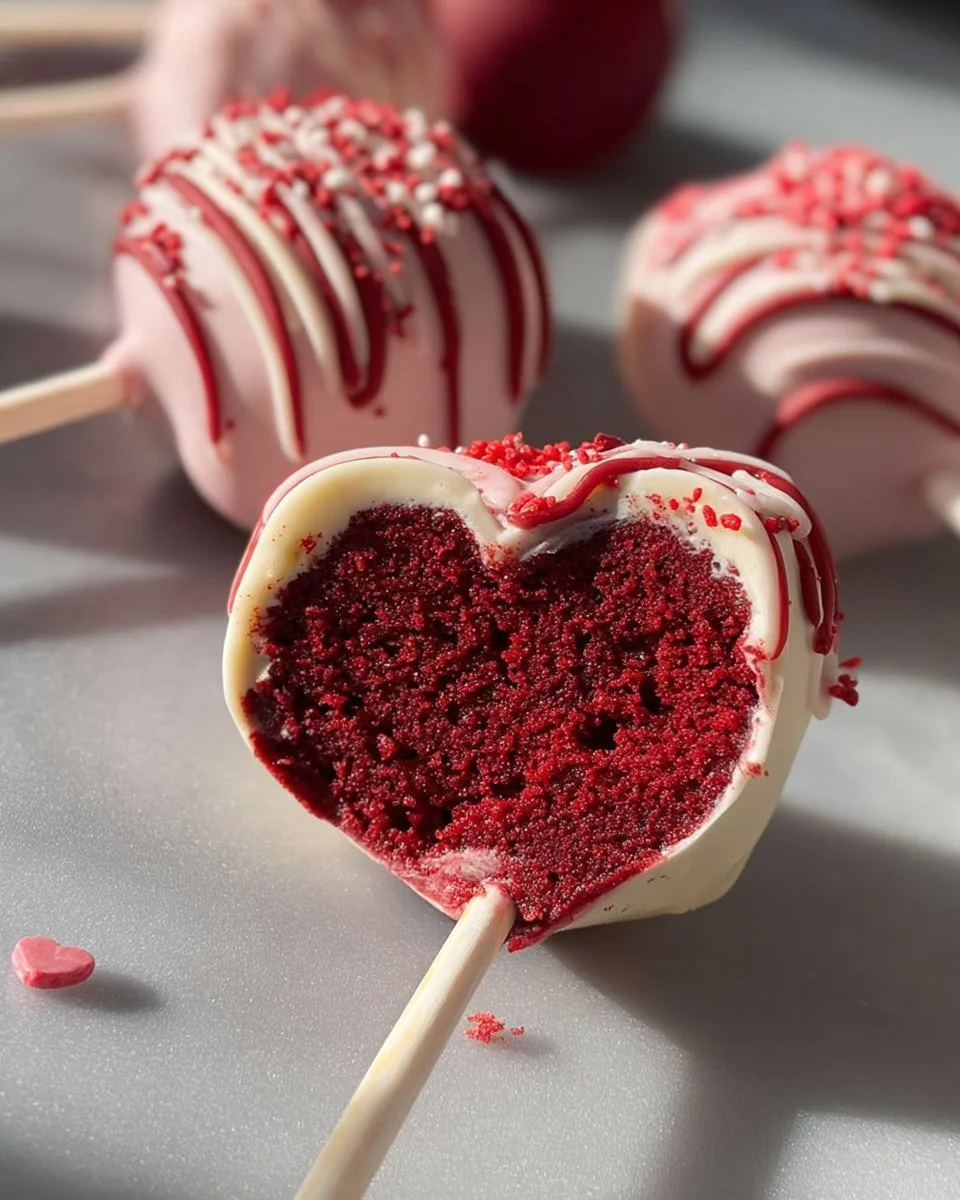
Heart-Shaped Red Velvet Cake Pops
I still remember making these heart-shaped red velvet cake pops for a last-minute classroom party — they vanished faster than I could arrange them on a platter. Tiny, festive, and built from a box mix with a few pantry staples, these pops are an easy way to deliver bakery-style charm without a lot of fuss. They’re perfect for Valentine’s Day, bridal showers, school parties, or anytime you want a cute, handheld dessert that travels well. If you enjoy simple party sweets the way I do, they’re as satisfying to whip up as a quick 4-ingredient chicken pot pie is for a busy weeknight — comforting and reliably crowd-pleasing.
Why you’ll love this dish
These heart-shaped red velvet cake pops are ideal when you want a showy-looking dessert with minimal technique. They’re:
- Time-efficient: most of the work is assembly and chilling rather than baking from scratch.
- Kid-approved: bright color and a candy coating make them irresistible to children.
- Portable: pops are easy to hand out at parties, freeze ahead, or gift in a box.
- Customizable: change the color of the candy melts, add sprinkles, or swap fillings to suit the occasion.
“Little bites, big smiles” — one parent at the party told me they were gone before recess ended. That kind of instant approval is why I keep this method in my entertaining toolkit.
How this recipe comes together
Before you get started, here’s the quick flow so you know what to expect:
- Bake a simple red velvet cake from the mix.
- Crumble warm cake and mix with butter, cream cheese, and marshmallow creme to form a sticky dough.
- Press the mixture into heart-shaped molds and add sticks. Chill until firm.
- Dip in melted candy coating and decorate.
The whole process is mostly assembly and chilling — the only active cooking time is baking and melting the coating. Expect about 20–30 minutes active work plus chilling.
What you’ll need
- Red velvet cake mix
- 1 cup Milk (or water or plant-based milk)
- 3 Eggs
- 2 tbsp Unsalted butter (softened)
- ½ cup Cream cheese (softened)
- ½ cup Marshmallow creme
- 24 oz candy melts (pink or other colors)
Notes on ingredients:
- Use plant-based milk and egg substitutes if you need a dairy-free or egg-free version, but cream cheese can be swapped for a vegan cream-cheese alternative for a fully dairy-free pop.
- Candy melts can be replaced with tempered chocolate if you prefer a real chocolate snap (watch tempering temperature).
Step-by-step instructions
- Preheat your oven to 350°F. Line a baking pan with parchment or spray it with baking spray.
- In a large bowl, combine the cake mix, milk (or water), and the eggs. Beat on low for 30 seconds, then increase to medium and mix for 2 minutes until smooth. Pour the batter into the prepared pan and bake according to the box instructions.
- When the cake is done, remove from the oven and crumble the hot cake into the bowl of a stand mixer or a large bowl using a fork, until the crumbs are fine.
- Add the softened butter, softened cream cheese, and marshmallow creme to the crumbs. Mix until evenly combined and the mixture holds together when pressed.
- Press the mixture into heart-shaped silicone molds, smoothing the tops. Insert cake-pop sticks into each heart, pushing about halfway in. Chill the molds in the refrigerator until firm, at least 30–45 minutes.
- Melt the candy melts according to package directions, stirring until smooth and glossy. Dip each chilled cake pop into the melted candy, tapping off excess, and set upright to harden. Add sprinkles or piped decoration while the coating is still soft.
- Allow the coating to fully harden before serving—about 15–30 minutes at room temperature, faster if refrigerated.

Serving suggestions
These cake pops look party-ready displayed upright in a foam cake-pop holder or a decorated box filled with tissue paper. Serve them:
- On a dessert table beside simple pastries and coffee.
- Paired with small savory bites to balance sweetness; for example, offering a few handheld savory snacks or a simple bowl of chicken with buttered noodles at a family gathering keeps the menu well-rounded.
- As gifts: wrap individual pops in clear cello bags and tie with ribbon for favor bags.
How to store & freeze
- Fridge: Store cake pops upright in an airtight container for up to 5 days. Keep layers separated with parchment.
- Freezer: Place popped and fully hardened cake pops on a tray to flash-freeze for 1 hour, then transfer to a freezer-safe container. They keep well for up to 2 months. Thaw in the refrigerator for a few hours before serving.
- Food safety: because these contain cream cheese and egg in the cake, keep them refrigerated if not being consumed within a few hours in warm conditions. Do not leave at room temperature for more than 2 hours.
Pro chef tips
- Use a heart-shaped silicone mold — it makes unmolding quick and keeps shapes neat. Press firmly so there aren’t air gaps.
- If the cake-crumb mixture is too wet, add a few tablespoons of crushed graham crackers or cookie crumbs to firm it up. Too dry? Add a teaspoon of milk or marshmallow creme.
- Work with one color of candy melts at a time and clean your dipping station to avoid streaking colors. Use a tall glass to dip and rotate the pop for an even coat.
- Chill thoroughly before dipping. Cold centers reduce cracking and keep the coating smooth.
- For a glossy finish, add a teaspoon of vegetable oil to the candy melts when microwaving.
Creative twists
- Flavor swaps: Stir a teaspoon of instant espresso into the crumbs for a mocha note, or fold in a tablespoon of orange zest for a bright twist.
- Toppings: Use crushed freeze-dried strawberries, edible glitter, or white chocolate drizzle for contrast.
- Mini versions: Use smaller molds to make bite-sized hearts for trays or cupcakes.
- Dietary changes: Use gluten-free cake mix and certified dairy-free substitutes to make these gluten- and dairy-free.
Your questions answered
Q: How long does the whole process take?
A: Active time is about 20–30 minutes (mixing, pressing, dipping). Include chilling and hardening and you’re looking at roughly 2–3 hours total if you chill between steps; much of that is inactive.
Q: Can I make these a day ahead?
A: Yes. Finish them completely, store upright in an airtight container in the fridge, and they’ll be fine for 2–3 days. For longer storage, freeze as described above.
Q: My candy coating is cracking—what went wrong?
A: Cracking usually means the cake pop center was still too warm when dipped, or the coating was cooled too much during handling. Chill completely and work in a cool, dry room. Slightly thinning your candy melts with a bit of vegetable oil can help flexibility.
Q: Are these safe for kids (raw eggs in the cake)?
A: The eggs are baked in the cake, which makes them safe. Avoid recipes that use raw egg-based fillings. If you’re concerned, use a cake mix that doesn’t require eggs or use pasteurized eggs.
Q: Can I make these without a stand mixer?
A: Absolutely. Use a sturdy bowl and a wooden spoon or your hands to combine crumbs and mix-ins until evenly incorporated.
Conclusion
For a video-assisted guide and another perspective on shaping and decorating, check out this detailed resource: Red Velvet Cake Pops (Heart-shaped) | Dessert Recipe with Video.
PrintHeart-Shaped Red Velvet Cake Pops

Cute and easy red velvet cake pops perfect for parties and special occasions.
- Prep Time: 30 minutes
- Cook Time: 30 minutes
- Total Time: 60 minutes
- Yield: 24 cake pops
- Category: Dessert
- Method: No-Bake
- Cuisine: American
- Diet: Vegetarian
Ingredients
- 1 box red velvet cake mix
- 1 cup milk (or water or plant-based milk)
- 3 large eggs
- 2 tbsp unsalted butter (softened)
- ½ cup cream cheese (softened)
- ½ cup marshmallow creme
- 24 oz candy melts (pink or other colors)
Instructions
- Preheat your oven to 350°F. Line a baking pan with parchment or spray it with baking spray.
- In a large bowl, combine the cake mix, milk (or water), and eggs. Beat on low for 30 seconds, then increase to medium and mix for 2 minutes until smooth. Pour the batter into the prepared pan and bake according to the box instructions.
- When the cake is done, remove from the oven and crumble the hot cake into fine crumbs.
- Add the softened butter, cream cheese, and marshmallow creme to the crumbs. Mix until evenly combined.
- Press the mixture into heart-shaped silicone molds and insert cake-pop sticks. Chill until firm, at least 30–45 minutes.
- Melt the candy melts according to package directions, then dip each chilled pop into the melted candy, tapping off the excess. Allow to harden before serving.
Notes
For a dairy-free version, substitute with plant-based milk and vegan cream cheese; use tempered chocolate for a real chocolate snap.