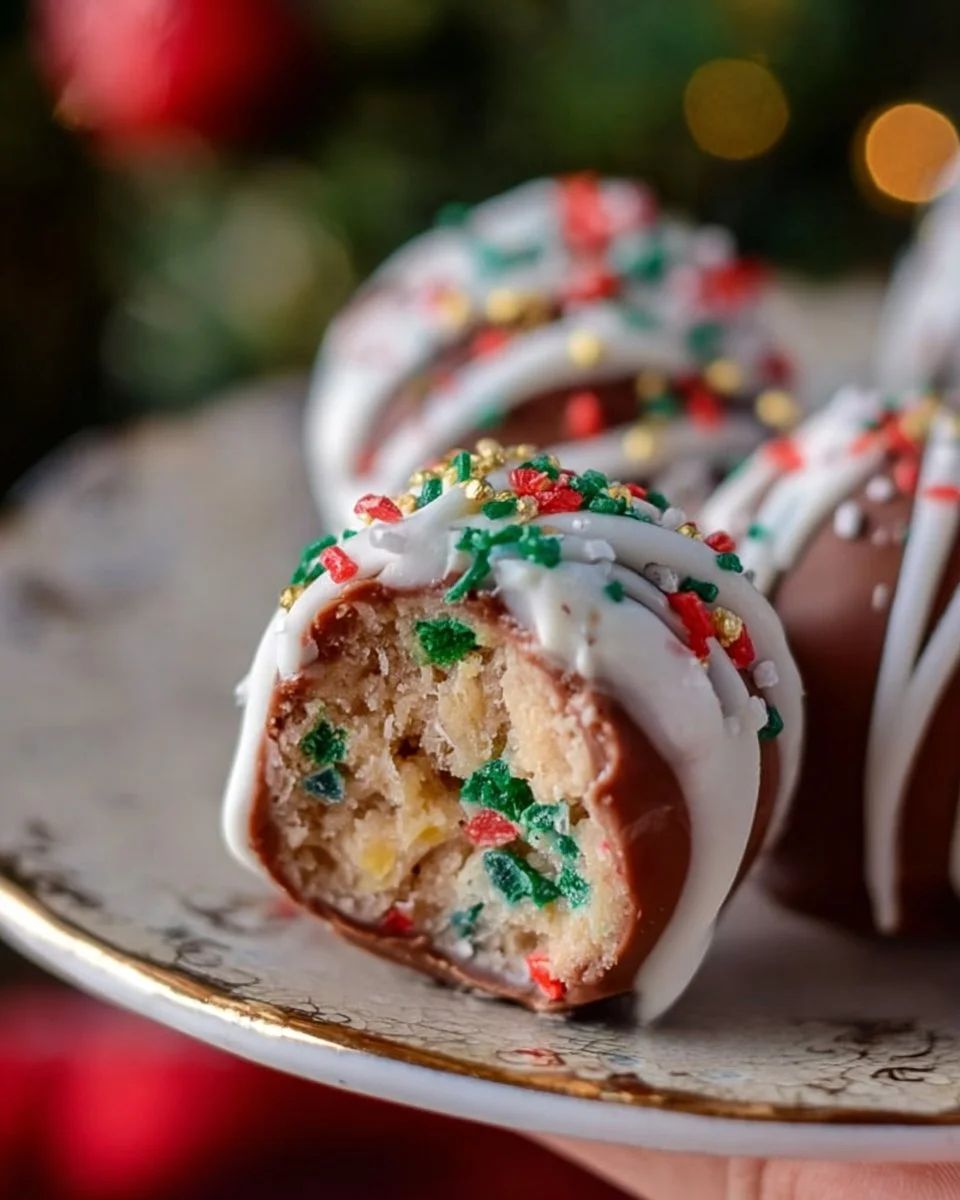
Little Debbie Christmas Tree Cake Truffles
I have a soft spot for nostalgic holiday treats, and these Little Debbie Christmas Tree Cake Truffles are the kind of easy, festive dessert that makes seasonal entertaining stress-free. They turn the familiar green-iced snack cakes into bite-sized, no-bake truffles that are perfect for cookie plates, school parties, or last-minute hostess gifts. The mix of cake crumbs and cream cheese gives them a fudgy, creamy center, while the white chocolate coating and sprinkles make them sparkle like tiny ornaments.
Why you’ll love this dish
These truffles are quick, budget-friendly, and wildly kid-approved. They require no baking, only a few simple ingredients, and can be made ahead — ideal for holiday cookie exchanges or as a quick addition to a dessert board. If you enjoy playful seasonal snacks (think the pop of a themed dessert tray), you might also like this fun Caprese holiday idea: Caprese Christmas Tree. The process is forgiving, so even beginners get consistent results.
How this recipe comes together
Overview: You’ll transform crumbed Little Debbie Christmas Tree Cakes into a lightly sweet, creamy mixture, shape them into bite-sized balls, chill to firm up, then dip in melted white chocolate and decorate. The key stages are: crushing, mixing with cream cheese, chilling, coating, and decorating. Allow about 45–60 minutes total with mostly hands-off chilling time.
What you’ll need
- Little Debbie Christmas Tree Cakes (about 12 cakes; yield ~24 truffles depending on size)
- 4 oz (half a block) cream cheese, softened
- 8–10 oz white chocolate chips or almond bark, for coating
- Festive sprinkles for decorating
Substitutions and notes:
- Cream cheese: full-fat gives the best texture; Neufchâtel will work but may be a touch looser.
- White chocolate vs. almond bark: almond bark melts smoother and firms up faster, which is handy for party prep. White chocolate delivers a richer flavor.
- If you want a gluten-free option, try using a gluten-free or alternative holiday cake base; for more festive baking ideas see this twist on cinnamon rolls: Christmas Tree Cinnamon Rolls.
Step-by-step instructions
- Break the Little Debbie cakes into pieces and pulse in a food processor until they’re fine crumbs. If you don’t have a processor, place the cakes in a sealed bag and crush with a rolling pin.
- Transfer crumbs to a mixing bowl. Add the softened cream cheese. Use a spatula or your hands to combine until the mixture is smooth and sticks together.
- Scoop and roll the mixture into small, uniform balls (about 1 inch). Arrange them on a baking sheet lined with parchment.
- Chill the truffle centers in the refrigerator for roughly 30 minutes so they firm up.
- While they chill, melt the white chocolate or almond bark in a microwave-safe bowl in 20–30 second bursts, stirring between intervals until fully smooth.
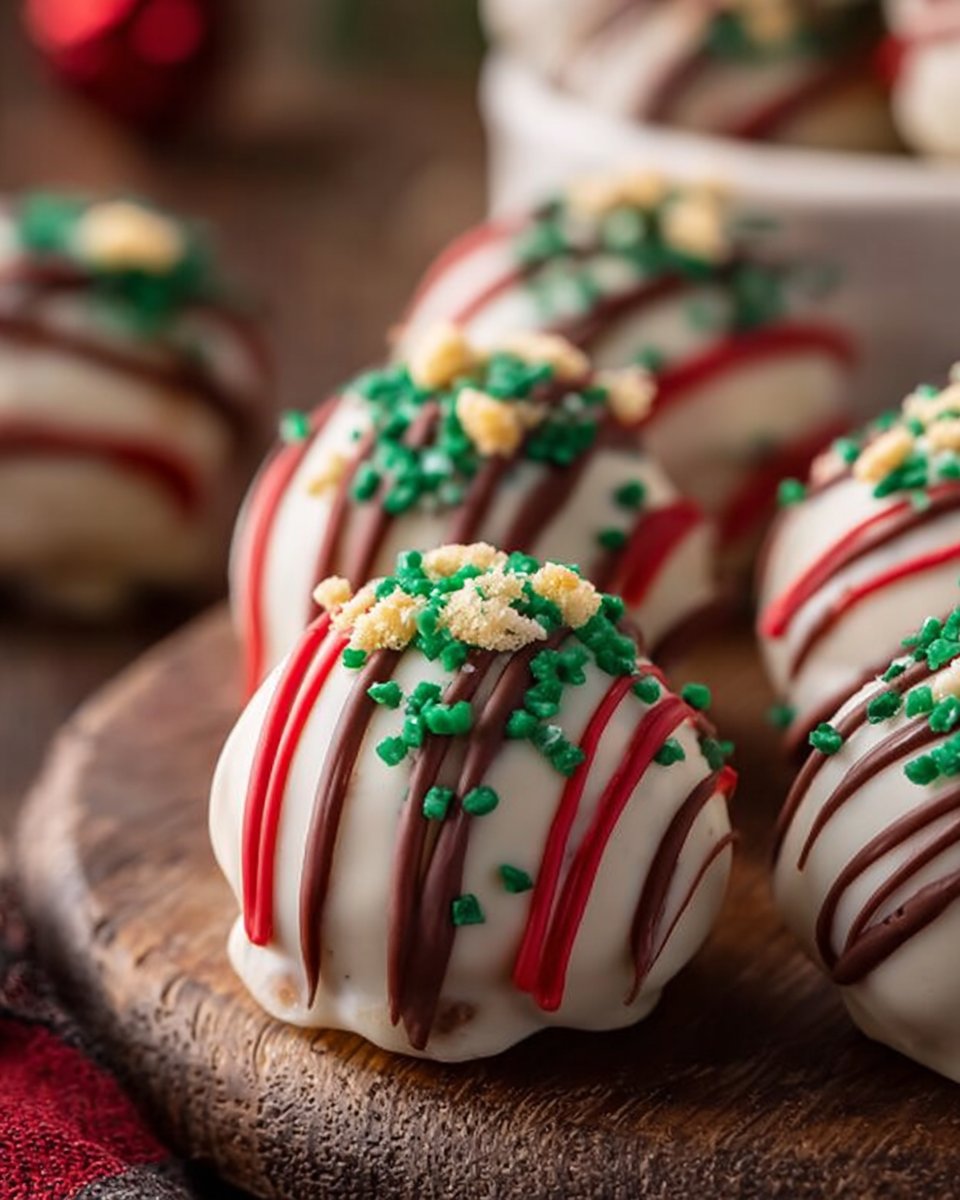
- Using a fork or dipping tool, lower each chilled truffle into the melted coating, turning to fully enrobe it. Tap the fork lightly to remove excess chocolate and return the truffle to the baking sheet.
- Before the coating sets, sprinkle with festive decorations. Work quickly — sprinkles stick best while the chocolate is still wet.
- Let the truffles sit at room temperature until the chocolate hardens, or refrigerate briefly to speed setting. Enjoy when firm.
Serving suggestions
Serving these truffles on a platter with other holiday sweets creates an instant centerpiece. Pair them with espresso or a chocolatey hot cocoa for contrasting temperatures and textures. For a grown-up twist, serve alongside a glass of sweet dessert wine or a peppermint martini. If you’re doing a dessert buffet, stagger heights with cake stands and include a few savory bites to balance the sweetness.
How to store & freeze
Short-term: Keep truffles in an airtight container in the refrigerator for up to 7 days. Let them sit at room temperature for 10–15 minutes before serving so the white chocolate isn’t too firm.
Freezing: Flash-freeze the truffles on a baking sheet for an hour, then transfer to a freezer-safe container with layers separated by parchment. They’ll keep for up to 2 months. Thaw overnight in the refrigerator, then bring to room temperature before serving.
Food safety: Because these contain cream cheese, keep them refrigerated when not serving and discard if left out more than 2 hours.
Pro chef tips
- For neater coating, chill the truffles until they’re well firm. Softer centers make the chocolate layer crack or drip.
- Use a fork and a second fork to roll off excess chocolate — this results in a smoother finish.
- If your melted white chocolate thickens while you work, add a small splash (1/2 teaspoon) of neutral oil or shortening and reheat briefly.
- To speed prep when entertaining, make the centers a day ahead and dip them the morning of your event. For more holiday truffle ideas and flavor inspiration, check out these orange-chocolate truffles: Tasty Orange Chocolate Christmas Truffles.
Flavor swaps
- Peppermint: stir 1/4 teaspoon peppermint extract into the melted coating and top with crushed candy cane.
- Chocolate-dipped: use semi-sweet or dark chocolate instead of white for a richer, less-sweet bite.
- Nutty: fold 1–2 tablespoons finely chopped toasted almonds into the cake-cream cheese mixture for a little crunch.
- Dairy-free: substitute vegan cream cheese and dairy-free coating chocolate; texture will be slightly different but still tasty.
- Filling surprise: press a small caramel candy or a toasted pecan into the center of each ball before chilling for a hidden treat.
Common questions
Q: How long does this take to make from start to finish?
A: Active hands-on time is about 20–30 minutes. Chilling and setting add roughly 30–45 minutes, so plan for about an hour total.
Q: Can I use a different Little Debbie flavor or another store-bought cake?
A: Yes. Any small iced or frosted snack cake will work. Flavor will vary slightly — chocolate cakes give a deeper flavor, while vanilla-based cakes stay light.
Q: Are these safe for kids to help make?
A: Absolutely. Kids can crush cakes, mix, and roll balls. Adults should handle the hot melted chocolate and dipping step.
Q: Can I make these ahead for a party?
A: Yes. Make centers up to 48 hours ahead and keep refrigerated. Coat the day of the event for freshest appearance, or fully finish and refrigerate up to 7 days.
Q: What if my white chocolate seizes when melting?
A: Seizing happens when moisture gets in. Remove from heat, add a teaspoon of neutral oil, and stir until it smooths. If it’s grainy, start with fresh chocolate and keep bowls dry.
Q: How many truffles does this recipe make?
A: With 12 Little Debbie cakes you’ll usually get about 20–28 truffles, depending on the size you roll.
Conclusion
These Little Debbie Christmas Tree Cake Truffles are an effortless, crowd-pleasing holiday treat that look far fancier than they are. For another take on this no-bake favorite with step-by-step photos and tips, see this easy version: Little Debbie Christmas Tree Cake Truffles (Easy No-Bake Recipe …). If you want alternative instructions and more decoration ideas, this guide is also helpful: Little Debbie Christmas Tree Cake Truffles – My Incredible Recipes.
PrintLittle Debbie Christmas Tree Cake Truffles

Easy, no-bake truffles made from Little Debbie Christmas Tree Cakes, perfect for holiday gatherings.
- Prep Time: 20 minutes
- Cook Time: 0 minutes
- Total Time: 60 minutes
- Yield: 24 truffles
- Category: Dessert
- Method: No-Bake
- Cuisine: American
- Diet: Vegetarian
Ingredients
- 12 Little Debbie Christmas Tree Cakes
- 4 oz cream cheese, softened
- 8–10 oz white chocolate chips or almond bark, for coating
- Festive sprinkles for decorating
Instructions
- Break the Little Debbie cakes into pieces and pulse in a food processor until fine crumbs.
- Transfer crumbs to a mixing bowl. Add the softened cream cheese and combine until smooth.
- Scoop and roll the mixture into small balls (about 1 inch). Arrange on a baking sheet lined with parchment.
- Chill the truffle centers in the refrigerator for about 30 minutes until firm.
- Melt the white chocolate or almond bark in a microwave-safe bowl in 20–30 second bursts, stirring until smooth.
- Using a fork, dip each truffle into the melted chocolate, turning to coat. Tap to remove excess chocolate and return to the baking sheet.
- Before the chocolate sets, sprinkle with festive decorations.
- Let the truffles sit at room temperature until the chocolate hardens or refrigerate to speed up the process.
Notes
For best texture, use full-fat cream cheese. Can be made ahead and stored in the refrigerator.